Friday, December 7, 2012

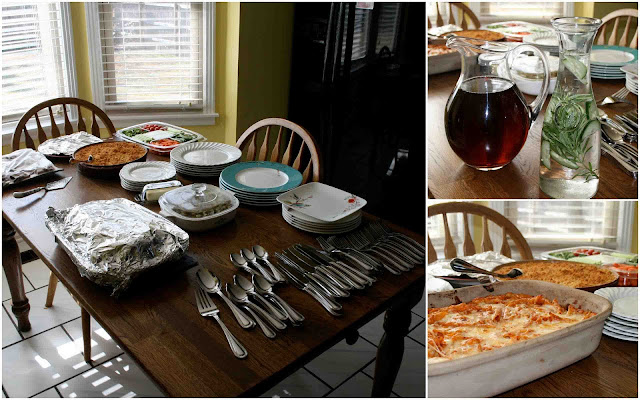
The Lovely Ladies Luncheon


Get it?

Like - You can't touch this (oh-oh oh oh oh-oh)
Break it down (more oh's)
STOP - manner time.

Ok. Well, I thought it was witty.

:)

Enjoy the photos and review of what we learned at the luncheon last week!


Did y'all love your invitations!?


Rhinestones, glitter, textured cardstock - you know, the works. 

As always, a HUGE thank you goes out to Mrs. Amy for being amazingly awesome. She was a fabulous - and gracious - host. What a servant's heart she has!


AND a HUGE thank-you goes out to all of the girls (and parents) for bringing absolutely scrumptious food so that we could dine pot-luck style!


Don't forget the tips you learned about hosting a party. The most important elements to hosting a party in your home is:
(1) Aroma - burn a candle or bake some fresh cookies for an inviting scent.
(2) Music - have music softly playing in the background.
(3) Good food - doesn't have to be fancy, just something for your guests to snack on if needed (unless, of course, it's a dinner party!).
(4) Decorations - continue reading for ideas.
(5) Good company - this luncheon had fabulous company!!


Create simple but wonderfully appealing centerpieces by combining a few of these ideas:
(1) Gather vintage vases or old bottles from antique/thrift stores. Place fresh or dried flowers in them. Do you have clear bottles? Layer a few white beans in the bottom to complete the look.
(2) Tear the front and back covers off cheap, faded and unwanted books. (You may want to look up the value of these books online before ripping them up though!!) Stack a smaller book on top of a slightly larger book and tie some jute or twine around them.
(3) Pair arrangements in three's. For example, in the main photo below, we paired a vintage tea pot with a vintage vase and a modern owl (from Hobby Lobby). Arrange items so that they are at different heights.

Did you notice that we put the bread rolls in Santa's sleigh?... That was a collaboration effort between a couple of my students. ;)


Old Reader's Digest books are inexpensive and can be found at most antique/thrift stores. These are great for stacking and adding height to any arrangement.


We put all of the plates and silverware in the kitchen and left the chargers empty so that the girls could set their own place settings.

The place settings should be arranged as follows:
Dinner plate on bottom, salad plate on top.
Forks on your left.
Remember: F-O-R-K has four letters and L-E-F-T has four letters.
Spoons and knives on your right.
Remember: S-P-O-O-N and K-N-I-F-E have five letters and R-I-G-H-T has five letters.
Size of the silverware goes from smallest on the outside to the largest on the inside. 
Follow the sizes with each course (i.e. furthest fork from you is for your salad, largest fork beside your plate is your dinner fork).
Tea glasses always go to the top right of the plate.
Napkin goes in the lap. 


Table Etiquette Tips:
*Sit up straight.
*Cross your legs at the ankles.
*Keep your elbows off the table.
*Always wait to begin your meal until everyone sits down at the table - whether at a fine dining restaurant or Chick-fil-A. 
*Be on time!!
*Set the table at your home for your family. Taking the time to set a pretty table will make mealtimes more pleasant and special. It is also telling the person that is preparing the meal how much you appreciate what they are doing!
*Write a thank-you letter to your host or hostess if asked to dine at someone else's home.


After we went over a list of table etiquette pointers, we passed a box of cards around the table called Table Topics. My favorite question was, "At what age is someone old and how does a person stay young?"

There were a variety of answers from 17-years-old is "old" to 40-years-old to 80-years-old. My favorite answer is, 
"You're only old when you begin thinking that you're old." 

That's wisdom -- from a teenager. 
I love it.


We finished up the afternoon with a present-wrapping and bow-making lesson where the girls dominated. I'm pretty sure they'll be giving out packages this year with stellar packaging! 


How to Make Blissful Bath Salts...


Need a quick last-minute gift idea? 

This bath salt recipe is easier than spreading peanut butter on crackers. 

Grab a carton of Epsom Salt, some food coloring and your favorite essential oils (use the ones from your sugar scrub or try a new scent).


I'll be using my go-to essential oils: Lavender and Eucalyptus.


These gel food colors from Wilton have lovely colors. I used the green (left box), and teal and purple (right box). You can use whichever colors you'd like though! Get creative. :)


Step 1: Measure out how much Epsom salt you will need in correlation to the jar you will be putting the bath salts into. I used these half pint jelly jars, so I filled one up to the lid and poured it into a big bowl. (I used three jars for the green food coloring, so I did this three times.)


Step 2: Add the food coloring. I started out with a few drops but thought it was too light green.... so then I added a few many more drops.


Step 3: Add a few drops of the essential oil...


Step 4: Mix the salts, food coloring and essential oil together.

Step 5: I decided the eucalyptus smelled too "VapoRubbish" for my liking, so I added some lavender to even out the aroma. 


Step 6: Smellin' awesome and lookin' good... but still too light green. So then I added some teal food coloring to the lime green salts to add depth. 


Step 7: Wipe out your bowl and repeat the steps with the lavender and purple food coloring. 


Step 8: Perfection. :) Put a lid on it and tie a pretty bow around the lid. 
Sprinkle a tablespoon of bath salts in a warm bath. Inhale. Exhale. Soak. :)

How to Make Sugar Scrub!!


I had such a blast making the sugar scrub and bath salts with the girls last week!! 

A huge thanks to Amy for her recommendation on this spectacular class idea!

Most of the girls seemed to love the exfoliating... one of the girls said, "Oh, you have to give us this recipe!! My mom is going to LOVE this!!" (I thought this statement was super sweet! Have I mentioned that you all have amazing daughters!?)

Here we go....

Grab a few of your kitchen staples:
*Coconut Oil
*Brown Sugar
*Extra Virgin Olive Oil 
our EVOO is in a Mason Jar because our bottle was leaking all over our cabinet shelves. When all else fails, fill up the Masons...

And your favorite aromatherapy essential oils:
*Lavender (calming) and Eucalyptus (exhilarating) were our choices.


Step 1: Pack 1 cup of brown sugar into a measuring cup and put into a large bowl.


Step 2: Pour in 1/2 cup EVOO.


Step 3: Measure out 3 Tablespoons of Coconut Oil and add to the mixture.


Step 4: Mix the brown sugar, EVOO and coconut oil with your fingers. Add more ingredients as you see fit. I added more brown sugar to make the scrub more coarse rather than oily.

Step 5: Add a few drops of essential oils until it smells pleasantly aromatic. 


I mixed lavender and eucalyptus simply because they smell so good together, but you should definitely try out other ones. Jasmine would be rockin'! In fact, I'm going to get some today to experiment later. :)

Side Note: Keep a bottle of essential oil in your shower and sprinkle a couple of drops at the bottom of a hot shower for a super soothing sauna experience! 


Step 6: Continue grinding up the mixture with your hands until nice and coarse. Grab a few Mason Jars and fill them to the rim. *You may want to whisk the mixture to make it fluffy before putting the mixture into the jars. 

Step 7: Tie a pretty bow around the jar...


Step 8: Exfoliate with a jar for yourself and gift a jar to someone else! 
*These make awesome Mother's Day, birthday, Christmas or hostess gifts!! 

Which essential oil will you experiment with?

Monday, November 5, 2012

How to Replace and Sew a Button

Have you ever lost a button in the washing machine? Or have you ever wanted to simply add a cute button to an apron or shirt? Follow this step-by-step tutorial and you will want to sew buttons onto all of your fabrics!! 

Ironically, the week before I had planned to post about sewing on a button, my husband just so happened to lose a button on one of his favorite shirts while we were in Hawaii. We'll use his shirt as an example...


Step 1: Grab your supplies: seam ripper, a button, a needle, matching thread, and a pair of scissors. If you will be replacing a button on a shirt or jacket, look for the replacement button inside of the shirt material, specifically along the seam around the bottom. Then use your seam ripper to release the button from the shirt (see below).

Step 2: Find the original spot for the button or decide on the place you want to add a new embellishment button. How do you find that spot? Glad you asked. There should be either some broken thread or a couple of itty-bitty holes from where the thread was before. Still not able to figure it out? Easy sauce. Fasten up the other buttons and pass a pin through the hole of the missing button. Whichever way you do it, make sure you mark the replacement button spot with chalk.


Step 3: Thread the needle. (See below for thorough photographic instructions.) Pull one end of the thread through the eye of the needle. Pull that end of thread to meet the other. Knot the ends together by making a loop and pulling the tails through. Knot once more, and trim off any excess.


Step 4: Let's get stitchin'. First, push your needle up through the back of the fabric to the front, pulling the thread all the way through. Slide your button on down the thread to meet the fabric. Are your holes lined up with the button in place? 

Perfect. 

Now you can push your needle down through the opposite hole and out the back of the fabric. Make sure your stitching matches the pattern of your other buttons. Repeat this four or five times per hole. The thread should be tight enough as to where the button doesn't dangle. At the same time, it should be loose enough as to where your fabric doesn't bunch up. Whew! 


Step 5: Shank and Snip... Push your needle up through the back of the fabric to the shank (which is the thread located between the fabric and button). See the needle in the top two photos below? Pull the button away from the fabric and wrap your thread tightly around the shank. Simply slip the needle through the shank twice and trim the leftover thread.


Step 6: Sport that button with pride. Boo-yah.


Thursday, October 11, 2012

Class Freebie: Mason Jar Pin Cushion Tutorial

Aloha!!
JD and I are finally back from our three and a half week trip to Hawaii! I'm so excited to get back to the homeschool co-op next week. We will be starting our two-week lesson on how to sew an apron. I'm so excited, in fact, that I put together these little pin cushion - mason jar - sewing kits for each student. 

I hope they love them as much as I do!! 


Want to make one for yourself?

I'm stealing the tutorial from our family / shop blog for your easy access...

I've seen quite a few Mason Jar pin cushions on Pinterest. I've taken the best ideas from other blogs and came up with this step-by-step tutorial with a number of Jitney's Journeys twists.

Here's what you will need for the kit:


Seam Ripper
Tailor's Chalk
Measuring Tape
Sharp Pair of Scissors 
Needles
Pins
Buttons
Thread

*Fortunately, Hobby Lobby is holding a 50% sale on all Sew-ology items this week. Whew!


And here's what you will need for the pin cushion mason jar:
Mason Jar
Scissors
Tag Punch (only if you have one laying around)
Cardstock
Hot Glue Gun
Super Cute piece of Fabric (measuring approx. 5.5" x 5.5")
Poly-fil (see image below)


Ready?

Let's do this...


Step 1: Punch out a circle from a piece of cardstock. You will glue this onto the back of the Mason Jar lid next. This tag punch measures 2.5" in diameter. If you do not have a tag punch around this size (should be 2.5" or smaller in diameter), you may freehand a circle with the approx. diameter or trace the lid and cut about 1/8" off. The tag punch is, by far, the quickest and easiest solution.


Step 2: Hot glue the circle to the back of the Mason Jar lid. The cardstock helps to adhere the fabric. 


Step 3: Cut a 5.5" x 5.5" square of fabric. 

Thank you, Hobby Lobby, for selling super cute fabric. 


Step 4: Lay the front of the Mason Jar lid onto the wrong side (or back) of the fabric. Place a dollop of hot glue one side and adhere. Don't glue anything else yet. 


Step 5: Grab a handful of Poly-fil. You can use as much as your heart desires, but a handful was sufficient.

I tried to take photos of every step but it got a little tough here, as I only had one hand to work with while the other was snapping photos. Multi-tasking at its best. ;) 

Step 6: Place the ring of the lid upside down on a flat surface. Stuff the Poly-fil in between the fabric and lid in as much as a puffy ball as possible. Push the stuffed fabric-Poly-fil through the ring and align the lid into the ring. You may want to add or subtract some of the Poly-fil here.

Step 7: Try to pull the fabric around the ring while holding the lid in securely, so that there are no cinches of fabric. Now your lid should look similar to the bottom right pic above.  


Step 8: Pull the fabric in small amounts (may need to be twisted or trimmed in some areas so it won't be too bulky) and begin hot gluing. Once you have almost finished a semi-circle, take the other side and glue it so that there is a straight line across of fabric. Take the bottom of the semi-circle and twist it just enough to a point where you can tuck it into the straight line going across. It should look like the bottom right picture. Hot glue that baby in.

Tip: Toothpicks are a great way to tuck in the fabric without getting the scolding hot glue all over your fingertips. 


Step 9: Admire your new pin cushion and get super pumped about sticking some pins in it! 


Step 10: Adorn it with lovely colored pins, fill it up with sewing essentials and get ready to host a sewing party!!


You'll be receiving these special goodies soon!! 


Wednesday, September 5, 2012

Week 3 : Expect Great Things from a Great God

Parents... your daughters are amazing!! I was blown away by their responses to the exercise "this is who I desire to become, according to the Gospel." God is doing a mighty work in each of their lives and I am humbled so deeply at the fact I get to see His growth come to fruition in their hearts. If you helped guide them through scripture in order to complete the homework, thank you!! I encourage you to sit with them throughout the semester and discuss whether or not they are seeking and achieving the goals they have set to become more like Christ.

We discussed the contrast between our perception of ourselves vs. God's perception of ourselves, and how our perception of ourselves should be replaced by how God views us... as a Princess of the King, a lady who is cherished and adored by our Savior. 

This concept is merely impossible for me to wrap my head around every day, so I can only imagine their little cabezas were pretty baffled as well! It's a lot to take in. :)

I gave them each a magnet with our class info and the verse Psalm 139:13-14. This is a reminder to each student that God created her inmost being, knitted her intricately in her mother's womb, that she is fearfully and wonderfully made... and for that (among many other reasons), we should be confident in who He has created us to be and to PRAISE HIM!


At some point in the class, we began talking about purity. This was totally not in the plans for class, but when the Holy Spirit leads, you gotta follow His direction!!

I didn't go in depth for this conversation, as the girls range from ages 12 to 17 years old, but we did talk briefly about dating (don't date anyone you can't see yourself marrying one day) as well as praying for their future husbands. As the Lord has done a miraculous work in my life through praying for my husband (years and years before knowing who he would be), I get super excited about speaking to young ladies about the importance of praying for their future husbands and setting the non-negotiables prior to dating. The girls seemed to be pretty pumped about a few of the ways I prepared for my future husband, so we will be tweaking the syllabus a little and spend one class session on the topic of: Praying and Waiting for My Future Husband. 

In class this week, the girls filled out "My Lifetime List" (a similar idea to a bucket list). I made one of these in high school and have completed almost everything on the list - thanks to opportunities the Lord has opened to me... and to my parents for giving me a "Travel Jar" to save my pennies after I told them I had put traveling to Australia on my list. The purpose of this exercise is for the girls to DREAM BIG!! Set goals that seem unattainable and watch God unfold them if they are seeking His will. 


Parents, I encourage you to go through the lists your daughters came up with and discuss ways they can reach those goals... even if that means giving them a "Vacation Jar" to save their pennies for that big trip to Hawaii, Japan or tour around Europe they're wanting to venture on. Find creative ways to challenge them in reaching for those goals. Once again, the Lord humbled me in a mighty way when I saw students writing, "Go on a mission trip" or "Serve somebody". Your daughters are precious. Take comfort in knowing God is using you, parents, in a mighty way!!


Final Note: I will not be teaching for the next four weeks. If you need me, I will still be fully accessible (via phone or email). The wonderful Mrs. Amy Miller will be taking over! Thank you, Amy!!

Monday, August 27, 2012

Week 2 : Toffee-Almond Popcorn Balls

Are you ready to make this savory, semi-healthy snack?


Well, the girls of our Life Skills were definitely ready this afternoon. They tackled this toffee task fearlessly!! Now you can too... if you dare.

Warning: This project has the potential of becoming overwhelmingly messy, so layer those countertops with the necessary protection (tarps, maybe?).

As my students would say, the first thing you do in the kitchen is.... 
Read the directions. They are wonderful listeners (I explained that reading the directions is vital, as the creators of those directions spent countless hours trying to come up with the perfect recipe and instructions).

Obviously, the "other"first thing you do in the kitchen is...
Wash your hands. Whew! One of my students got this one correct. :)

Now.

Let's get cooking...

One could easily skip this next tasty step, but it's one of the few things that sets this snack apart as "healthy". We popped our own popcorn, thanks to Pop-Secret Corn Kernels and Extra Virgin Coconut Oil.


Coconut Oil, though a couple of the girls showed a bit of distaste towards it in the beginning, is super healthy for you. In fact, it's one of the healthiest oils you can use when cooking. Unlike all of the unnecessary additives microwavable popcorn includes, the popcorn kernels only have one ingredient: Premium Jumbo Popping Corn. Compare those nutrition labels! Plus, it's much more fun to make. :)

P.S.: You can't taste the coconut oil in these popcorn balls when they're finished. 


Step 1: Scoop a teaspoon of coconut oil into a heavy 3 quart or larger pan with a lid. 


Step 2: Place a few kernels in the oil, cover pan and turn heat to medium high. When you hear that first kernel pop, that's your cue to add the remaining popcorn. (We used 2/3 cup of kernels.)


Step 3: Shake pan gently over the heat with lid slightly ajar to allow steam to escape.

Step 4: When popping slows to 2-3 seconds apart, remove pan from heat and carefully pour into a separate large bowl. Sprinkle it with a dash of salt, if you'd like.


Ok. Now that step is out of the way. Reward yourself for your hard work by sneaking in a few bites of popcorn. 

For the Toffee-Almond Popcorn Balls, you will need the following ingredients stacked along your counter for easy access:
  • 2 Tbl unsalted butter, plus more for shaping (yes, we'll be getting our hands buttered up)
  • 1 bag (10 oz.) mini marshmallows
  • 16 cups popped popcorn (from 2/3 cup kernels)
  • 1/2 cup toffee pieces
  • 1/2 cup chopped almonds
  • 1/2 cup mini chocolate chips
I broke the girls up into teams of 2 or 3, as each team was assigned a separate task. I have arranged the teams in order of the steps we made the recipe:


Team 1 Butterers: In a large pot (or it can be the same one you used to pop your kernels), melt butter over medium heat. 

Team 2 Mini Mallows: Add the mini marshmallows and cook, stirring, until melted. This should take about 5 to 6 minutes.

Team 3 The Almondeers: Pound the slivered almonds to make them "chopped almonds", measure out 3/4 cup and mix them into the marshmallow mix.


Team 4 The Toffee Gals: Measure out 3/4 cup of the toffee chips and mix them into the marshmallow-almond mix.


Team 5 The Chocolate Chips: Measure out 3/4 cup of the chocolate chips and mix the tasty treats into the marshmallow-toffee-almond mix.


Team 2 continues to stir the marshmallow mix.

In the meantime, we spread out three pieces of parchment paper along the countertops. Each girl got about 1/2 cup of popcorn placed on their corner of parchment. By this time, the marshmallow mix was ready.

The girls stood in line as I smeared a sliver of butter on each of their hands. {Messy, messy!!} This will help the shaping process.

I placed a spoonful of the yummy mix on top of each girl's bundle of popcorn and they began to form the popcorn into the shape of a perfect 4-inch ball. 

Before I knew it, they were chowing down!!


According to the original recipe, you are actually supposed to fold the popcorn into the mix so it looks a little something like this...


But we didn't do that because (1) it would be way too hot for the girls to form into balls and (2) it was a lot more fun and messy to do it the way we did in class. You may choose to fold in the ingredients if you're trying this on your own though. Place the perfectly rounded popcorn balls onto the parchment paper to cool. 

Here's the end result:


Delicious.


A huge thank you to the wonderful folks at Everyday Food for this recipe. :)
Makes 16 
Total Time: 30 min + cooling
per popcorn ball: 168 cal; 6 g fat (3 g sat fat); 3 g protein; 28 g carb; 2 g fiber